-
-
April 13, 2020 at 3:26 pm #277492
Anvar Bakhtiyarov
ParticipantHello everyone,
I am having difficulties importing flooring textures with 6″ or more wide wooden planks. It shows ugly narrow planks in the design .
Is there a way to match the texture scale to the exact flooring material?
-
April 13, 2020 at 4:30 pm #277496
Kristopher Papaleo
ParticipantHi Anvar,
Unfortunately in our program this would not be possible to achieve with an imported texture. Most items in our program (including walls, floors, and ceilings) do not have a set start point for textures. What that means exactly is that the texture you import will start and stop wherever it wants.
Kris
-
April 15, 2020 at 10:21 am #277551
Elania Gloria
ParticipantOh thank you for this thread! I am happy to introduce you one service that could help you offer some sample critique papers.
Attachments:
-
April 28, 2020 at 6:03 pm #279408
 Ariana ThompsonParticipant
Hi Anvar,
I make my own wood floors all the time – it’s a little finicky, but possible.
Here is an example. The boards are 8″wide.
Ariana
Attachments:
-
May 3, 2020 at 3:37 pm #279939Participant
How do you do that? Photoshop?
-
May 5, 2020 at 11:25 am #280460Ariana ThompsonParticipant
Hi Anvar,
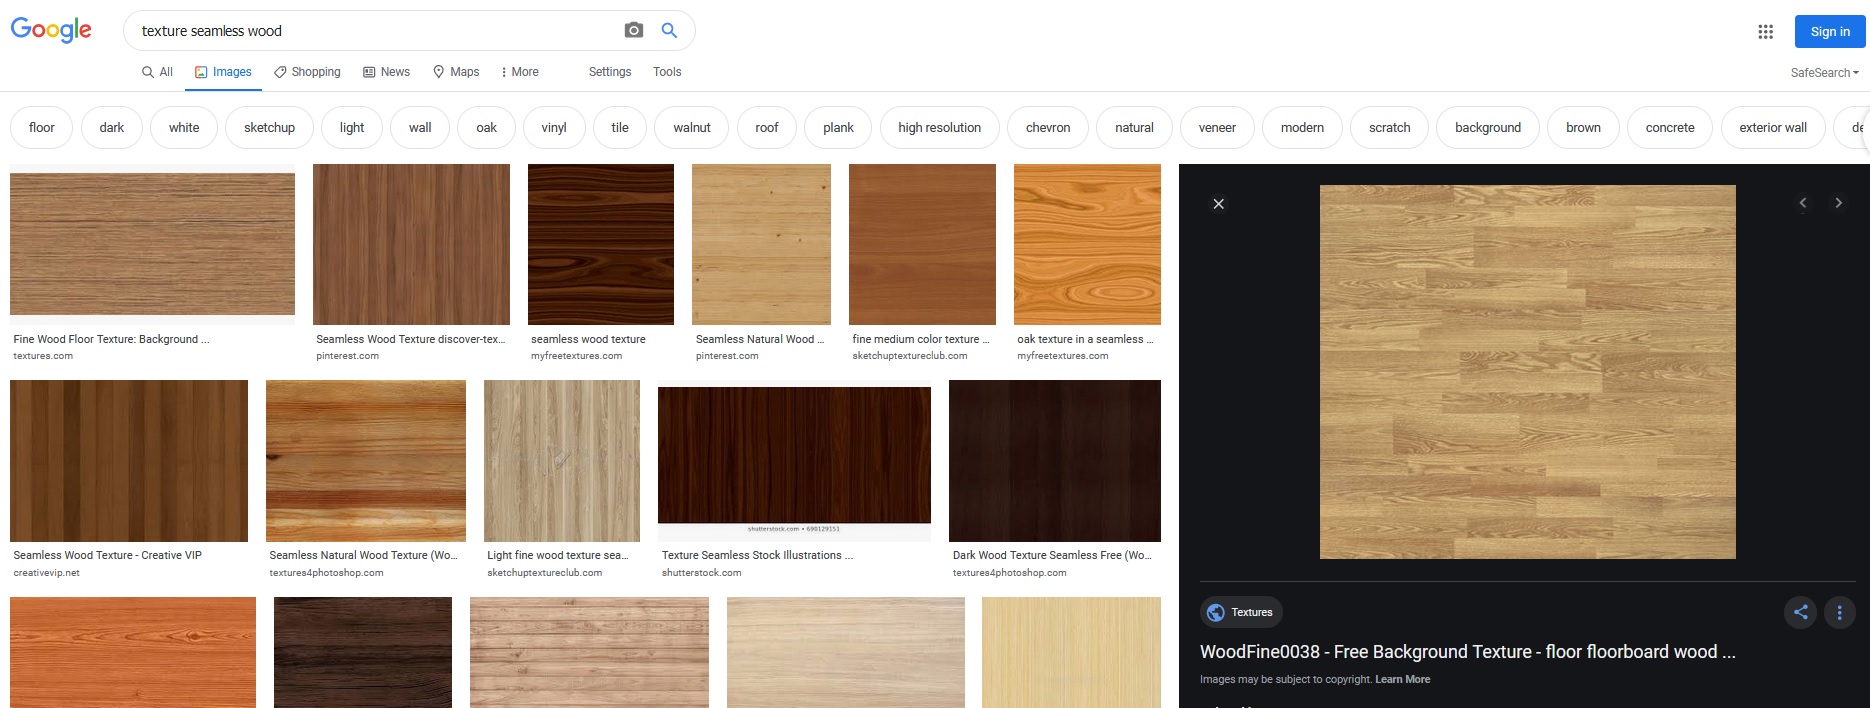
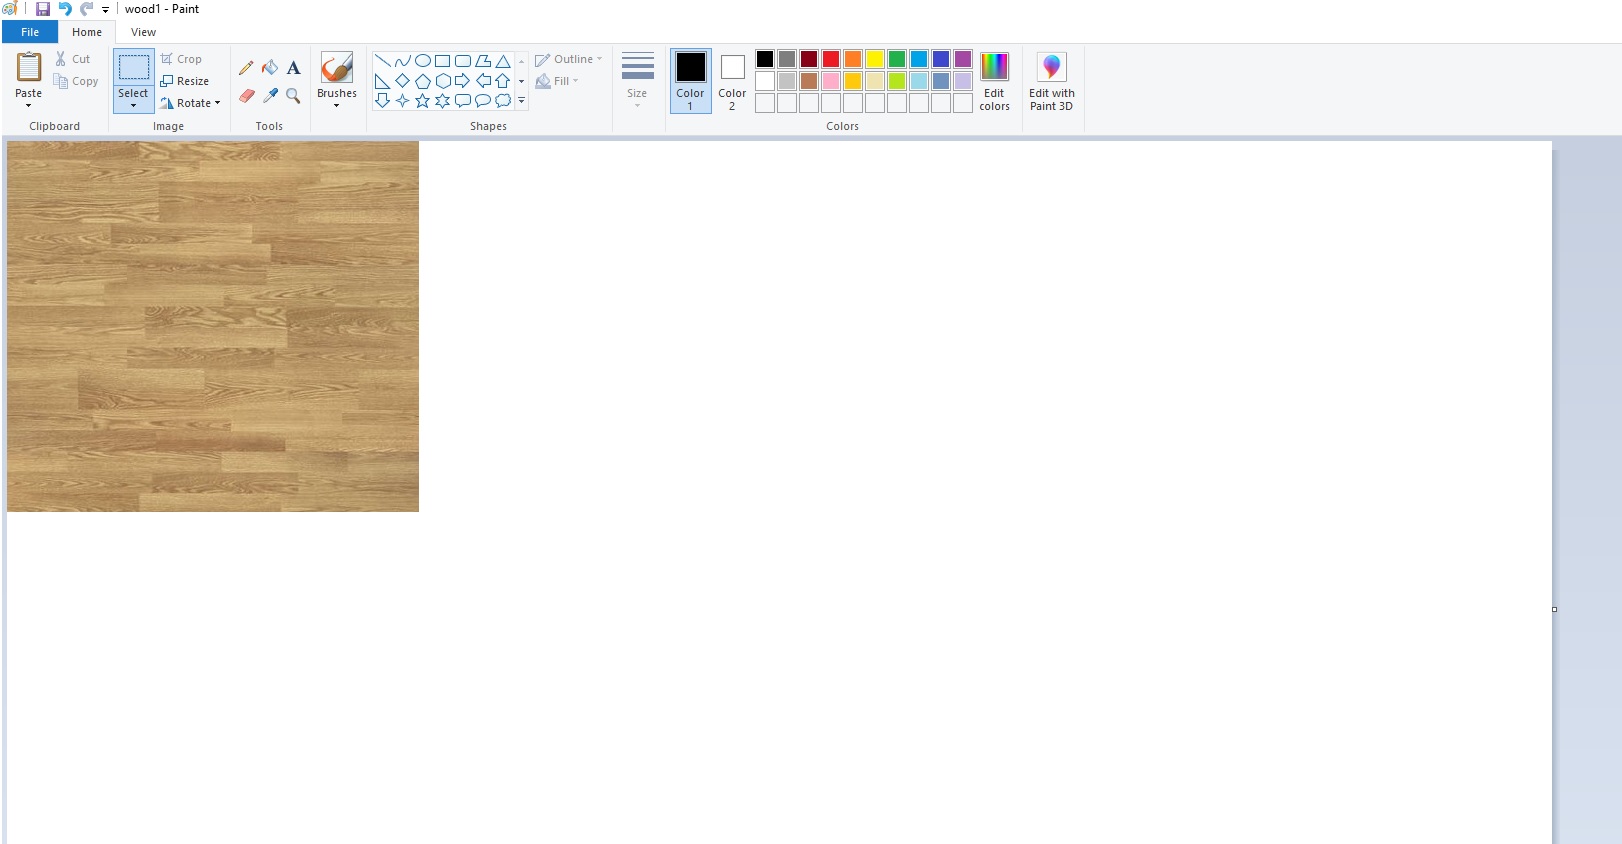
Sometimes I use a photo editing program (I actually use MS Paint – I know, LOL, -but it works for me), but if you can grab a good screenshot off Google images (search for: texture seamless wood, etc) that works too.
What takes fiddling and time is making it look realistically *random*. I usually do one when I have a quick, straightforward kitchen that I’m going to bang out in no time and I can afford to spend a little extra time on making a nice floor texture. Save a HORIZ version and a VERT version and you have it in your texture file for when you want a nice floor for a BIG kitchen – where time is money and you can’t screw around. Then you have a bunch you can choose from that look good.
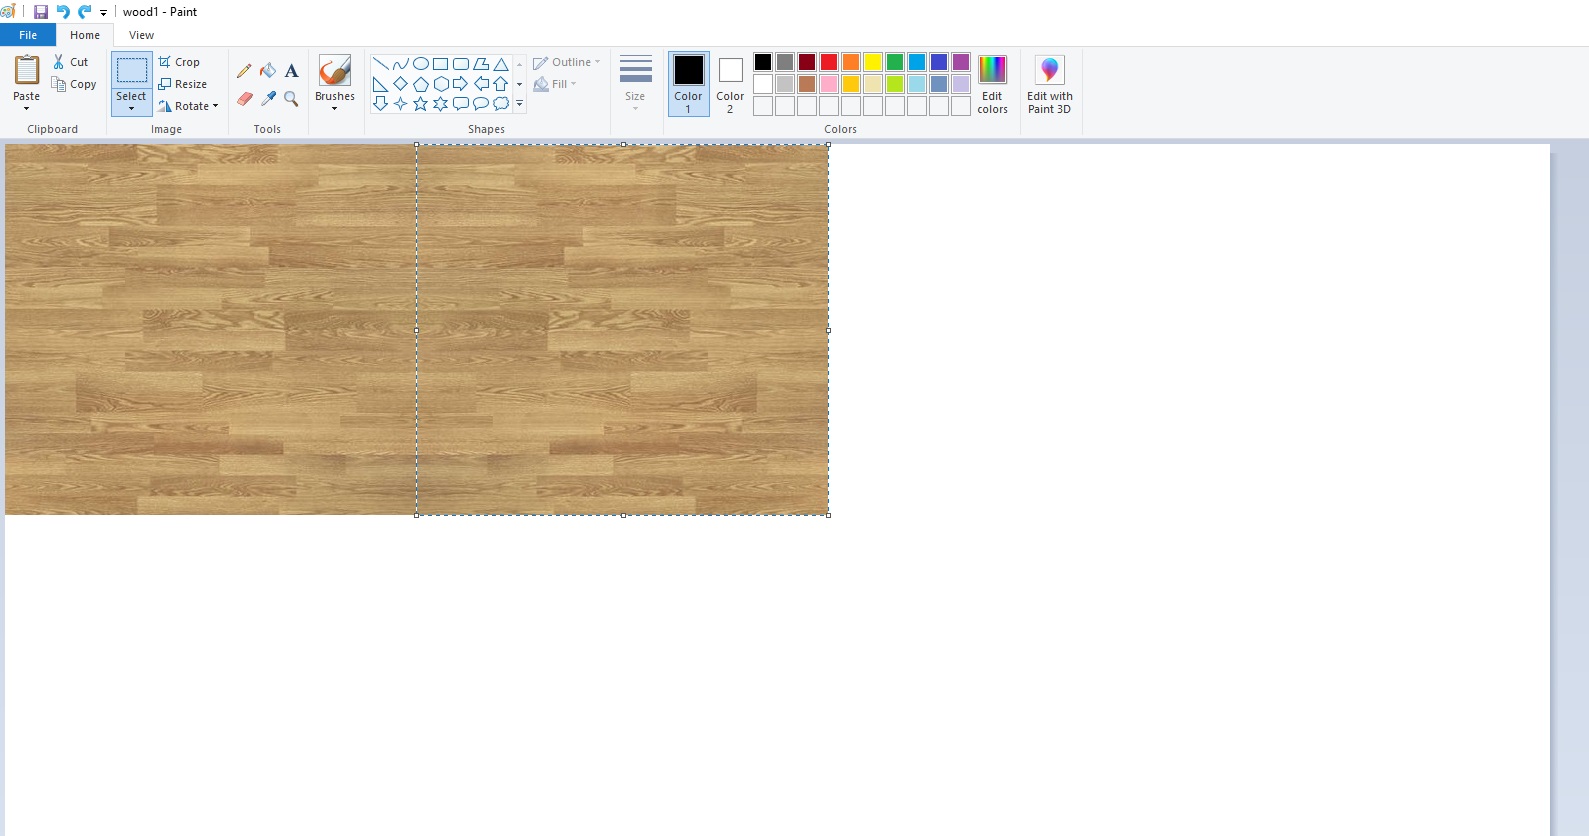
If you aren’t too worried about it looking really random, and just want it to flow seamlessly, open your image in the editor of your choice (like Paint!), and copy the image and FLIP IT horizontally, and join the two images – so you have a butterfly-like mirrored image. Then grab that entire butterfly and copy that, and FLIP IT vertically. Now you have a 4 square mirror. The image will now be seamless. Not too random – but seamless. If you want to spend the extra time editing the distinctive bits that make it OBVIOUS that it’s mirrored – you can. That’s the fiddly bit.
When pulling a texture into a render, I always choose the “larger” option. They tell you not to, but in my experience it will always be blurry otherwise.
As for getting the correct scale, it’s all about giving the texture the right size when you pull it in. If your texture image is five planks wide, and you know the floor has 8″ planks, then specify the width of the sample as 40″. The scale will then show them that size.
Two tips:
-bringing the texture into your design attaches that texture to your design FOREVER. So if it renders badly – you now have this unneeded hi-res texture dragging you down. Even if you replace it with a different texture – the file size of your design is now bloated. So if you haven’t used one of your textures in an actual design yet – drop a cube onto a blank design and give the cube your new texture in the correct scale. Then if it’s not looking good for some reason -you can do redo it without bogging down your design.
-also, remember that when you bring your texture image into a 2020 design and give it a scale, you can also give it a TEXTURE. If it’s glass, you can make it super shiny, if it’s brick, you can make it rough. How light behaves when it strikes your texture goes a long way to making it look real.
I’ve attached images of what I meant by the “butterfly-flip” thing, as I don’t think I worded that well.
Ariana
-
May 5, 2020 at 11:36 am #280515Ariana ThompsonParticipant
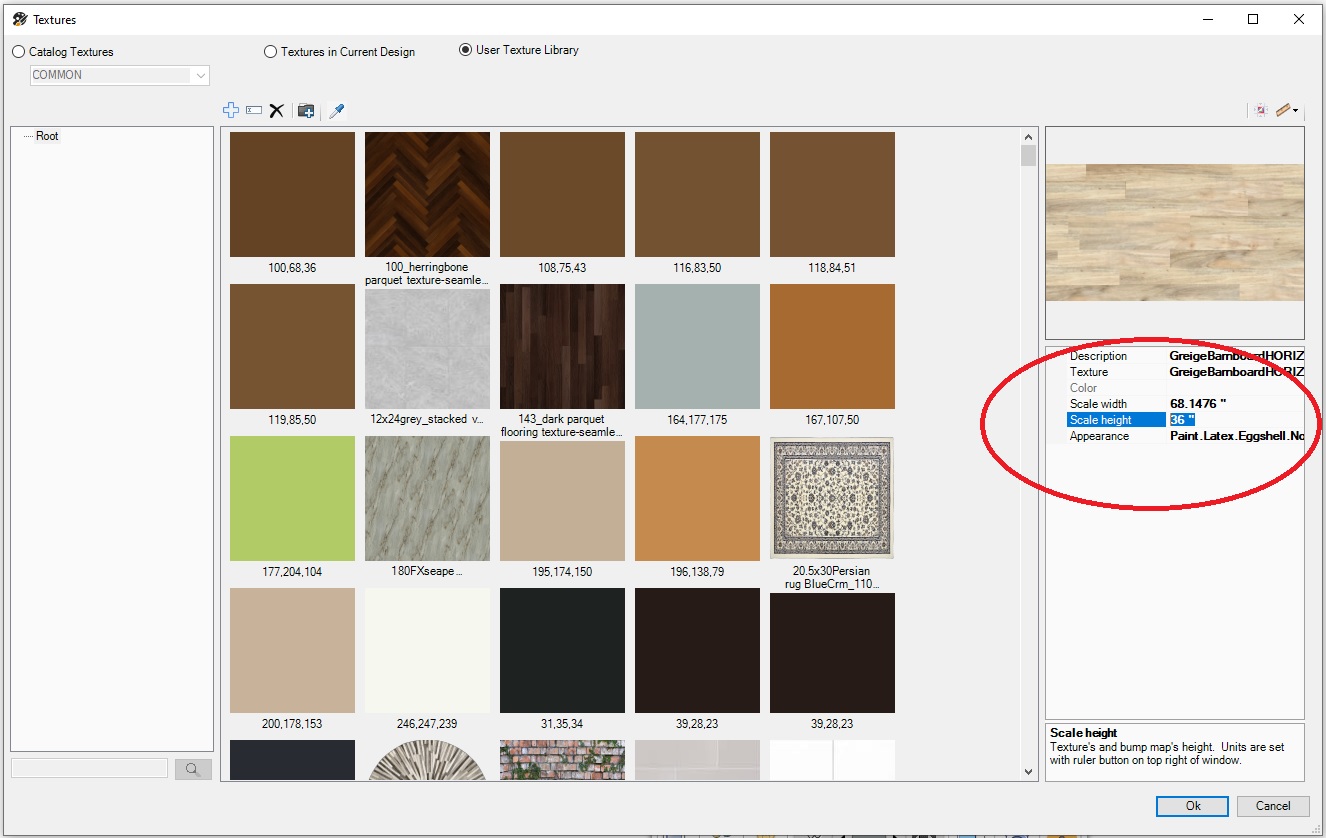
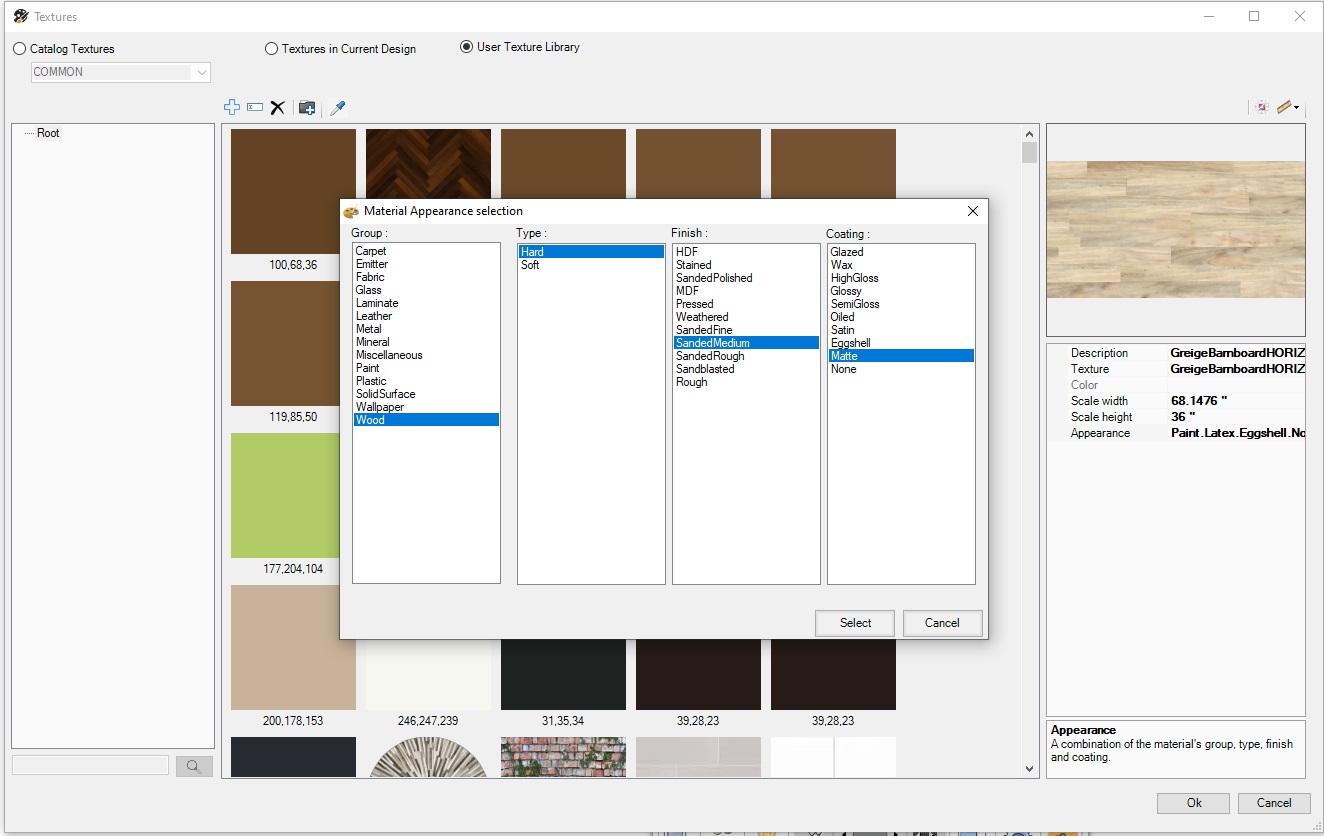
In case anyone hasn’t given their textures scale and surface sheen/texture yet, here are some screenshots.
The image I’m bringing is 8 planks high, and I want the planks to be 4.5″wide, so I made the height 36″.
Then if you click the Appearance field, three dots will appear. Click them and a series of selection windows will appear where you can give your texture…texture? Appearance!
My experience? Never choose glass for glass tile. It looks kinda weird. For glass tile I always choose Paint/Oil/High Gloss.
Cheers,
Ariana
Attachments:
-
May 5, 2020 at 11:44 am #280543Participant
Hi Ariana,
This is an awesome post and thank you for sharing it! I think this is a really cool way to get your floor texture looking as you want it to be. Keep up the awesome tip sharing! 🙂
Kris
-
May 5, 2020 at 3:16 pm #280597Participant
That was a perfect instruction! Thank you Ariana! The trick with flipping the image to make a seamless texture is so easy but so helpful. I REALLY appreciate your help!
-
May 5, 2020 at 3:21 pm #280598Ariana ThompsonParticipant
Glad I could help 😉
Ariana
-
October 13, 2020 at 7:17 pm #301042
Renee Davis
ParticipantTotal newbie here and your instruction is great… but I’m not seeing images that are attached to the text thread.. HELP!
-
October 14, 2020 at 11:16 am #301130Participant
Hi Renee,
Currently there is an issue on the forums that will not allow you to view images if you are signed in on the website. If you are signed out of the website then the images will appear. We are currently working on getting this issue resolved.
Regards,
Kris
-
October 26, 2020 at 11:07 am #303074Participant
Hi All!
The issue that the site was having with images has been resolved! You can now sign into the site and view the images on threads correctly!
Regards,
Kris
-


You must be logged in to reply to this topic.